Tuesday, August 31, 2010

Midnight Madness Sketch Challenge #69 (MMSC69)

Hello

It's time for this weeks Midnight Madness Sketch Challenge. This weeks sketch has circles involved and as soon as I saw this sketch I had my idea.The sketch can be viewed on Priscillastyles blog.

I used a Martha Stewart corner punch on a circular piece of CS to achieve the doily effect.
Cardstock is from Co'ordinations.
Designer paper-Wild Asparagus
Buttons and ribbon - Michael's
Stamp - Innovative Stamp Creations
Markers - Copic

Hope you enjoy the card, I had fun designing it for you.

That's it for now, thanks for stopping by, see you soon,

Barbara

Thursday, August 26, 2010

The Pumpkin Patch

Hi Everyone,
Look what I found in my studio today, a Pumpkin Patch. Aren't these too cool. I guess I am in the mood for the next season, autumn. This has been such a hot summer. Today it is the perfect temperature, 70 degrees and very low humidity. My kind of summer. I think days like this gets us ready for fall. I am ready, so bring it on.

OK back to the pumpkins. These are so cute and I made a few different ones to capture different looks.


The one on the far right (above picture) with the swirls, has ink applied direct to paper and swirls were stamped using a Lost Coast stamp.Here is a closer picture.


Next I decided to make a pumpkin and create a glitter effect. So I created my own glitter paper and this turned out great!!

This pumpkin was embossed with a Cuttlebug Embossing folder, Swirls, and colored with a Copic marker. Next I covered the whole pumpkin with VersaMark and them applied Shimmer Embossing Powder and heated it. I applied another coat of VersaMark and embossing powder to deepen the effect.


I did the same with this pumpkin but colored the reverse to get a totally different visual effect.This look is great as well.
Those leaves are from the same die as the pumpkin and I used alcohol ink to color them and then glittered them up using the glitter paper method. Glittering the leaves covers so much of the alcohol ink effect. You still see the colors but you lose the great visual effects from the alcohol ink technique. Of course its all in the look you are trying to achieve.


With this last pumpkin I made, I used paintable wallpaper. I colored it again with a Copic marker and then applied the VersaMark and the embossing powder,the end result is just as striking.


Here are 2 more pictures to try to let you see all the glitter.


These pictures do not do justice to these pumpkins at all.I think glittered items are hard to photograph.The pumpkin and the leaves are from a die from Accucut. Love their dies.

Well that's it for now, thanks for stopping by, see you soon,

Barbara


Tuesday, August 24, 2010

Midnight Madness Sketch Challange (MMSC68)

Hello Everyone.

Here is my 1st submission to the Midnight Madness Sketch Challenge. I have been a lurker for a while on the Priscillastyles blog  and decided to take the plunge. New sketches are posted weekly and are great. They are making me think outside the box and that's a good thing.

For the cream border I used a Martha Stewart punch and then criss crossed the ribbon. Printed paper is My Minds Eye and the solid color CS's are PopTones 100 lb. The Butterfly was made using a Marianne Design die, the silk flowers are from Offray and the sentiment is a PrintWorks rubber stamp.The fairy and the mushrooms are from Sparkle N Sprinkle.

Well, that's it for now, thanks for stopping by, see you soon,

Barbara

Saturday, August 21, 2010

Poppy (C4C51)

Hope you had a great Saturday.

I ran across this fabulous blog, Crazy 4 Challenges ,and I decided to design a card and submit it. Here's the card. I used a stamp from Stacy's Stamps (POPPY).I used my Sizzix Big Shot Pro to cut the Spellbinders die, Labels 10.Patterned paper is from Wild Asparagus, solid red card stock is PopTone Wild Cherry,cream card stock from Cougar.Three red buttons were added as the embellishment and the sentiment is a preinked word stamp from JustRite. Colored images with Copic Markers.

Have a great Sunday,

Well that is it for now, thanks for stopping by, see you soon,

Barbara

Friday, August 20, 2010

Lost Coast Angel

Today I made a card using an angel image I picked up at the Novi Michigan stamping convention. I stamped this and colored it with copics and then didn't know what to do with this.I actually looked at the image off and on for 3 days. As I looked at the image it looked like  a combination of an angel and a goddess from the egyptian era. So that made me think, antiquities, and I decided to distress the stamped image and that led to distressed watercolor paper and wella......


Check out the beads, (not the alpha ones). I made these from newspaper and followed the directions on my friend Angie's blog. I thought the beads would add a little something extra to the card.


Well that is it for now, thanks for stopping by, see you soon,

Barbara

Thursday, August 19, 2010

New stuff

Since I have been home from Stampaway, I have been playing with some new stamps and dies. Also I have been coloring with my Copics and the more I use them the more I like them. So as I get more familiar with them I know I am going to like them even more.

I saw this stamp set and knew I just had to have it, you know, it was screaming my name, so I bought it and worked it up just to see what it look like. Well I love this set.


Next I picked up some stencils and I haven't used stencils for eons but the end result made it worth the money I spent. I actually bought 4 different sets and talk about cool. These stencils are the plastic type not the brass type. These are also great for making your own background paper.  I just used the berry branch from this stencil and do you believe it, the berrys were done using a copic marker. I used a sponge dauber to apply ink for the branch. I really like the subtleness of the branch and the dominate red of the berry.
Next, I know everyone is familiar with Spellbinder Dies, well I found dies from the Netherlands and these are so nice. The work the same as a Spellbinder die and will fit in the same machine that you are currently using.


The dies on the left made the flower on the right on this card. I know this paper is kind of busy but I used some stencils with leaves and swirls. I wanted to see what background  I could come up with using one of the stencils I purchased recently. 

Here are a few more of the dies that I absolutely fell in love with. These are really cool and when I found them it was so hard to choose what to buy, the selection was huge. But I am happy with my selection.

Well that is it for now, thanks for stopping by, see you soon,
Barbara

Sunday, August 15, 2010

Stampaway Day 2 of classes............


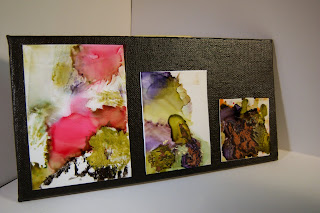
Well day 2 at Stampaway came early for me. And some of you know I am not an early riser. But I dragged my butt out of bed, went to breakfast in the hotel and went over to the hotel for my first class. 8:00 a.m., what a time for a class. This class (Sheer Fusion) was with Nancy Curry and she always teaches a great class. After 2 hours and much fun, I learned to play with alcohol inks a little differently. My masterpiece was done. Its amazing that a few colors of alcohol inks, a couple of pieces of transparencies  a black piece of canvas board and some masking tape can give you a really cool piece of artwork.(Getting up for this class was worth it.)

OK on to class #2. Gaye Medbury was the instructor and she taught us how to make a book called Step it Up. This is another class that I loved. This book is really not quite done. It needs some additional embellishments but the book is together and I love he way it looks and it is really pretty easy to do this book, even though it really looks complicated.

This book opens to pages that are in a step fashion and when you reach the center, you will see a page that explodes open to reveal a beautiful collage.


Amazing how a few folds can bring a book alive and make it so exciting.


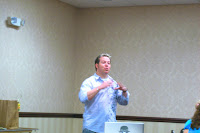
OK now it's time for class #3. The one and only Tim Holtz is the instructor. I waited in line for about 30 minutes while the class in the room finished and Tim could get in and get set up for the students who were eagerly waiting for his 1st class of the day. The first person I see is Mario checking all the bins that hold all the kits for the classes.


Next I see Tim and his other assistants going into the classroom to get it set up. In record time the doors open and we are allowed to come in and take our seats.


Charmed Possessions is the name of the class. Class starts and we all get our kits for the first class.We will be making a pin and 3 pendants.


The pin


A keyhole pendant


The Heart Pendant


The Bracelet

I am sitting at a table on the left side of the room up front. We have a great table location. And we are all at round tables. The room is a large room and we don't feel like sardines, yea!!!!!!


After a fast 2 hours, we are done with the class, and we have all made 4 cool things and we all are sorry the class is over. For those of us taking the next class we get to save our seats and go outside while they set up the room for the next class. So we all take a break and go back in after the room is ready again.

The next class I wasn't sure I would like. What, not like a Tim Holtz class?????? Well I am not a person who journals so The Journey Journal just didn't sound like something that I would necessarily like but, hey, it turns out it is a great little journal, a book or whatever you want to call it, but it is too cute!!!!


So whats not to like about this little suitcase.

It just so happens it holds the journal, and the journal is only 2 1/2  X 3 1/2.


A gift from Tim and Stampers Anonymous (Thanks Tim and Ted!!) And yes we received a gift in the first class as well, a grunge board alphabet. NICE!!!

All in all, the classes that I took this year were great and really exceeded my expectations.

Next was the preview party at 7:30  Friday night. It was so nice, and I saw so many familiar faces, vendors and friends alike. I got back to the hotel around midnight carrying a lot of bags. Saturday morning I went back to finish up and got home at 4:15. What a wonderful weekend.

Here is a small slide show that I made for other pic's that I took along the way. Enjoy!!


Tomorrow I will be going to the Burlington Antique Show at the Boone County Fairgrounds. Since the temperatures have been so high, I am getting an early start. I will be meeting a few friends at 8:00 to try and beat  the heat. So stop back to see what I pick up tomorrow.

Well that is it for now, thanks for stopping and see you later,

Barbara

Thursday, August 12, 2010

Stampaway day 1............

Well day 1 of Stampaway is over and I assisted in 2 classes and took one class. I assisted Lovely Linda in 2 of her classes. The first class, The Art Journal of Techniques was a great techniques class. Making a booklet with some cool techniques on each of the pages makes for a great reference. Her next class, Whimsical Assemblage Art was really fabulous and a great work of art.


Next I attended a class "Hang Ups"  (A Mobile Pieced of Art). This class taught how to make a very unique piece of art.  I found this very hard to photograph for you to view. This pic does not do this piece justice. I can't wait to hang this at home.


Tomorrow is a full day with classes all day. Two classes will be with Tim Holtz and I am sure they will be packed. I will post Saturday what I made tomorrow. After all the classes are through, the preview party will take place, so I will not be back until midnight. Please stop back Saturday for more pics of finished pieces from the classes I will be attending tomorrow.

Well that is it for now,thanks for stopping by, see you soon,

Barbara

Tuesday, August 10, 2010

Stamp Club Cards

I belong to a stamping club that meets once a month. One of the fun things that we do, is we have card challenge. We are given stamped images and we are to design a card with those images. I gave out the challenge images at the July meeting for the August challenge. Here is what everyone was given. I love these images, which by the way are from set 404 , Ocean Treasures, from Sparkle N Sprinkle.


Here is the card that I designed using those images.
You make the challenge and theme cards but you take home someone else's cards. We all look at all the cards and then we hold a drawing for the cards.


Here is the card I received using those images. I think it is so cool to see what others come up with using the same stamps.


The next card I received was a card made using the theme "double trouble". Notice the background, Pat drew that background freehand. It is beautiful, I think. She is very talented.


The last card is a card that we all made. Carol was the tutor this month and she gave each of us all the components for the card. The image was stamped and then copied onto photo paper. Next she passed around shoe polish and we brushed the polish onto the image and then rubbed the polish off the paper with a soft cloth. This gives the image an old look just like your old photos in that album you are still trying to work on. This is a technique she said she learned from Amy Flowers. I loved the background stamps that she made available for us to use on the card. This is a great card and I really love this style.


Last but not least, here is the challenge for next month's meeting. I love trees. I am not sure what I will be doing with this yet, but I have a month to get it designed and made into a card.


Well, I am off to Stampaway, a great stamping convention, right here in Greater Cincinnati. I must say, it is the best I have ever seen and I have been to more than a few this year. This convention has over 40 vendors and tons of classes. I will be assisting in 2 classes and actually attending 5 classes, 2 of which are being taught by Tim Holtz. I will be posting Thursday and Saturday showing all the things I made in the classes. So stay tuned ............

Well that is it for now, thanks for stopping by and see you soon,

Barbara


Novi Mich Stamp Convention

Last weekend, I drove to Novi, Michigan, for one of the Heirloom Stamping Conventions. I ran into Randi Barrett. Randi used to come into my store on her way to visit  her son and his family. She is on the design team for Our Daily Bread Designs and other design teams as well. Randi taught a make and take on Sunday at the convention. She is very talented. Check out her blog.

Saturday the convention was packed all day. On Sunday, we drove in to the parking lot about an hour before the show started, to tidy up the booth before the show got under way and there was already a waiting line. That was 1 hour before the doors opened. Sunday was a great day as well. Sunday, Amy Flowers stopped by to see me and she will be teaching a class at Stampaway on Friday. Amy is from Columbus, Ohio and is another great artist and instructor. If you ever get the chance to take a class of hers you will love it.

I will be attending Stampaway again this year,and start taking classes Thursday. I have 2 Tim Holtz classes and quite a few others as well. Since the hotel I am staying at has free wifi. (Yea!!), my plan is to update you all, in the evening, showing what I made in the classes I took that day. So, stay tuned for Stampaway info for those of you who won't be there.

Well that is it for now, thanks for stopping by, see you soon,

Barbara

Thursday, August 5, 2010

Photo Stamps

Have you ever looked at a stamp and knew what you wanted to do with it or how you were going to apply color etc. In other words the stamp was calling to you??? Well I had spied a few stamp sets that I believed would lend themselves to a particular coloring technique that I just love to do. These are stamps that look like photos,you know the ones that have those tiny little dots on the stamp, and no matter how you work the stamp up, it just doesn't come out just the way you want it. I happen to love those kind of stamps. I call them photo stamps. They have all the little pixels (dots) that make up the image. I learned this technique from a friend, Jackie, and wow what a difference this color technique will make on those type of stamps.


Just a couple of notes:
1. Kromekote Glass Cover cardstock gives a very glassy gloss. It is by far, the best ever, for a glossy paper. Marco's Paper carries it.
2. I use Marvy Markers because I have that brand in my stash, this technique will work with Tombow makers and their blender marker as well. However, I have not tried this technique with any other marker brands on the market other than the Marvy or Tombow.


Here is how I achieved the look on this card.

Have on hand:
Black StazOn
Kromkote Glass Cover Cardstock
Marvy Blender Marker.(A Dove Blender will not work)
Markers of assorted colors that you plan on using in your project.
Stamp


I stamped the image with StazOn Black, onto the Kromkote CS. After the StazOn is dry you will want to start to work in a small area and remember to always use the blender marker before you apply the colored marker. I start with the blender marker and apply circles of blender to the bare image. A little area at a time, about the size of a quarter. Next over that blender area, apply your color in the same manner, circles. Go back over the area you just colored with the blender again in a circular motion and blend out to the edge of the area of the image you are working on. Keep doing the blending, coloring and blending until you are finished with your image. Remember when changing from one color to another you will want to take your blender marker and swipe it on scrap paper til the color is gone, otherwise you will be applying old color with the new color and will wind up with a color you don't want.

Well that is it for now, thanks for stopping by, see you soon,

Barbara